If you were ever asked to picture a typical English scene in your mind’s eye, chances are, there would be a plain tile roof in there somewhere. Clay plain tiles have been a part of our heritage and roofscape for hundreds of years; their actual size being set in law by King Edward IV in 1477, when an Act of Parliament set plain tile dimensions at 10 ½ “ long by 6 ½” wide, a size still standing today. Apart from subtle variations such as single and double camber, the plain tile has remained unchanged for hundreds of years.
It is safe to assume that the roofing industry knows pretty much all there is to know about installing double lapped plain tiles. It is this long experience in use that tells us what the minimum roof pitch should be and how to achieve the many intricate and interesting roof designs that suit plain tiles. It has long been enshrined in our British Standards for roofing that the minimum roof pitch for plain tiles is 35 degrees, or 40 degrees for handmade clay tiles that do not fall into the geometric tolerances set manufacturing standards.
Clay and concrete plain tiles actually perform extremely well at roof pitches below 35 degrees when subjected to wind driven rain testing using the method described in PD CEN/TR 15601: 2012: Hygrothermal performance of buildings. Resistance to wind-driven rain of roof coverings with discontinuously laid small elements. Test methods. Though we should be very cautious about using them below 35 degrees for a couple of reasons; firstly, the minimum roof pitches are set based on hundreds of years of experience in use and protect not only the weather tightness of the roof, but also the long term durability of the roof tiles and other materials. Secondly, architecturally, plain tiles simply do not look right at lower roof pitches.
Because of their small size and double lapped installation, there are simply no other roof tiles or slates that are as versatile as plain tiles. The rules of plain tiling are actually very straight forward; the roofer needs to keep to the minimum headlap, which is normally 65mm, and the minimum side lap, which is 55mm. In practice, this means that the tiles will work just as well, provided the side joint is anywhere within the middle third of the tile below. The tiles can be cut to vary the cover width, something not possible with single lap tiles. This variability of cover width is ideally suited for curved roofs because of their continually varying cover width distances. Similarly, the camber from top to tail means the tiles can be laid to vertical curves without creating unwanted gaps at the tails.
On a convex or concave curved roof, the tiler can maintain the roof curve by adjusting the width of tiles. In practice, he would lay full tiles until the bond reached the outer limit of the middle third and then cut a tile or a tile-and-half tile to bring the bond back towards the centre.
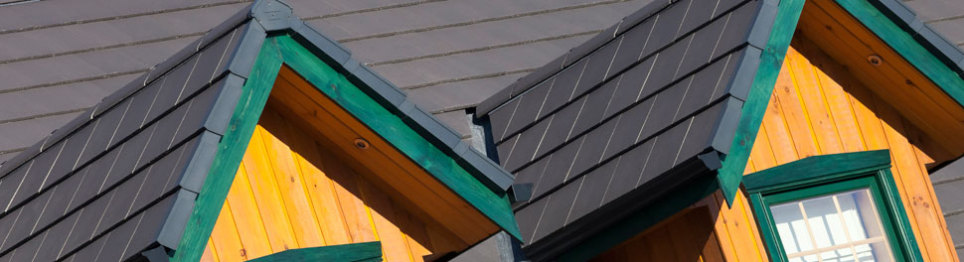
The possibilities for the designer are endless; for example, eyebrow-shape roofs over dormer windows, swept and laced valleys where the tiling can turn, or sweep around the valley from one roof face to the other, instead of having a junction weathered with lead or fibreglass, conical turrets, domes and many other convex and concave roof shapes.
The rules of plain tiling are simple, but the successful execution of the work very much relies on the skill and experience of the roofer, as he continually checks to ensure that he maintains the rules. Though, even where the minimum side lap cannot be maintained, the roofer can overcome this by inserting metal soakers between the tile courses. These are not seen on the finished roof but they ensure the roof remains weathertight.
The reward is a finished roof that cannot be equalled in appearance, durability and technical performance.